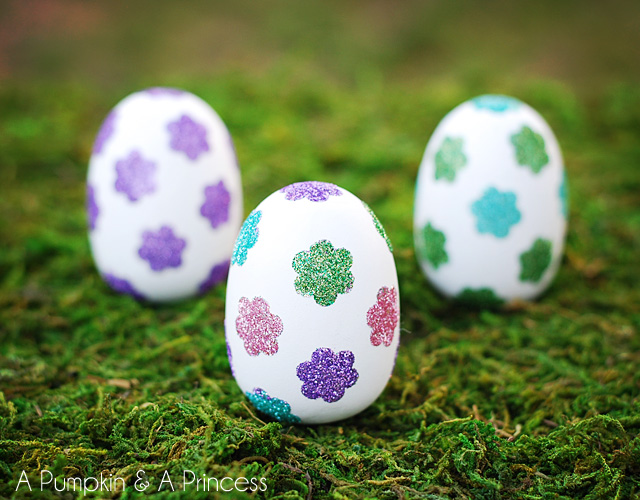
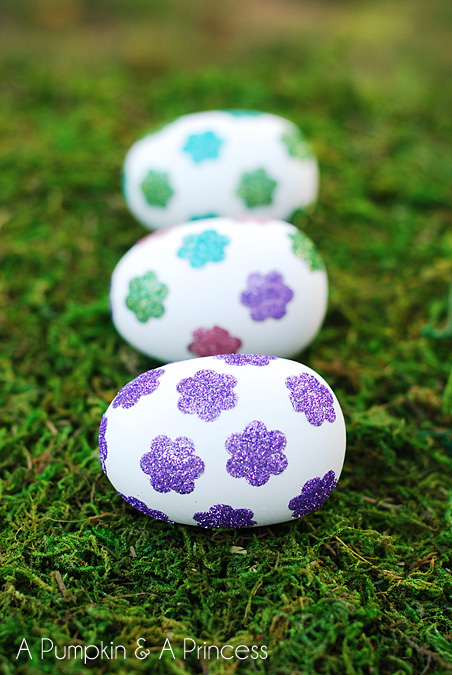
Making Easter egg crafts with the kids is one of my favorite holiday traditions. Every year we try to create a new Easter egg project along with our normal egg dyeing routine. These pretty Flower Glitter Easter Eggs are a spinoff of our glitter polka dot Easter Eggs we made last year.
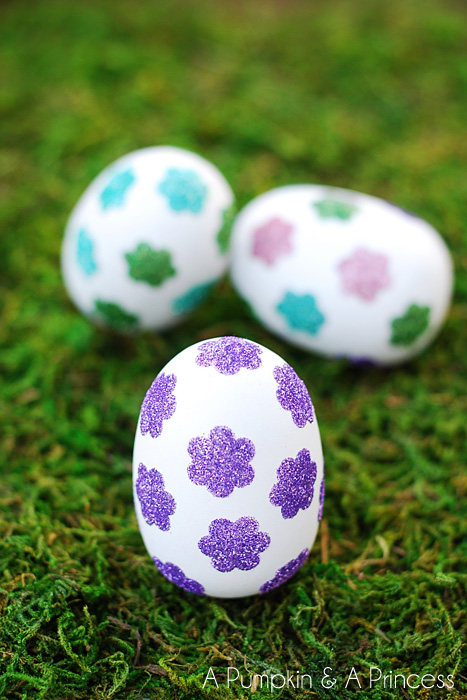
The kids loved glittering eggs with glue dots last year! Since I’m really enjoying working with double-sided adhesive lately I thought I would have the kids punch out flower shapes to decorate white wooden eggs with. We found the painted wooden eggs at Hobby Lobby and they were perfect for this craft.
Supplies:
Wooden eggs
double-sided adhesive sheets
Martha Stewart glitter
brush
Flower Glitter Easter Eggs Tutorial:
1. Punch flower shapes out of double-sided adhesive sheets.
2. Peel backing off of the flower shapes (leave the top layer on until you’re ready to glitter).
3. Once you have all of the flowers in place remove the top layer of the adhesive and pour glitter on each shape. If you are using multiple glitter colors only glitter a few shapes at a time to avoid blending the colors.
4. Use a brush to remove the excess glitter.
This is an easy Easter egg craft that the kids will enjoy and you can use in your decor year after year. However if you simply change your mind you can easily remove the adhesive and start with a blank canvas all over again!
Thanks for stopping by!
Crystal, these eggs are so cute! I never would have thought to punch out different shapes on double sided adhesive to decorate eggs….brilliant!
I’m hosting a March Madness Party and I’d love for you to come and share this post…I’m sure others would LOVE to learn this super awesome technique.
https://4you-withlove.blogspot.com/2013/03/march-madness-party-link-up-begins.html
Have an amazing day!
Marilyn
What a CUTE idea! :)
I’d love for you to join my Link Up!
https://www.pluckys-secondthought.com/pluckys-link-up-and-blogiversary-celebration-giveaway/
Oh, so pretty Crystal! I love those sweet flowers! Glitter is so fun to work with on eggs! You always rock the Easter crafts–and every other craft!
adorable!
Super cute!! I didn’t think you could top the polka dot glitter eggs, but you have!!!
You and your little sweeties sure aced the eggs. So pretty and festive. And they won’t break or come apart, you’ll have them always. Perfect. Great memories with the kids. Happy March
So cute! I love how they look on the green moss!
Any little girl would love these, they are so cute! The double sided adhesives seems very convenient. Glue would have made a mess {plus you couldn’t get the pretty shape}. Great idea! I’m having a link party on my blog and I’d love for you to join!
https://www.simplydreamandcreate.com/2013/03/simply-create-thursdays-1_7.html
Amazingly cute, love the glitter!! Thank you for sharing and have a nice sunday
Anytime I see a craft with glitter I have to give kudos! I have glitter-phobia and that stuff just scares me! I like the idea of using the double-sided adhesive sheets though, seems like it’d be less messy.
These are the cutest things ever! Pinning. Great job!
Those are so pretty … love that double sided adhesive!
Such a fun idea! Pinning to the Monday Funday pin board! Thanks for sharing :)
I put glitter on pumpkins and Christmas decorations, I have to put them on Easter eggs! These are so pretty :)
Love all things glittered!
Kelly
super cute! I remember the ones from last year too… loved them then, love them now :o) I came over from Sugar Bee Crafts. Would love for you to share this at my Tuesday Link party as well! https://www.nap-timecreations.com/2013/03/st-pattys-pasta-and-tasteful-tuesday.html
clever idea with the double sided adhesive and love the flower shape. Martha has the best glitter! LOVE!
these are so fun. i need to try these:)
Super fun!
These are so pretty. How can I resist a glittery egg!